Deploying Dedicated Media Streamer: Expert Tips for Installing DVB Tuner Drivers on Proxmox and Ubuntu
 Gleb Sazanov
Introduction
In the high-stakes environment of data centers, dedicated media streamers play a critical role in delivering high-quality DVB streaming services. The Digital Devices Max SX8 Pro (4/8) – 8 Tuner TV Card is a top-tier solution designed for such demanding applications. With eight DVB-S/S2/S2X tuners on a single PCI Express card, this card offers an unparalleled combination of performance, efficiency, and versatility. The compact design, low power consumption, and flexible operation modes make it ideal for a wide range of streaming setups.
Specifications
BBFrame Output: 1
DVB Satellite Reception Properties: 8APSK-L [5/9|26/45], 8PSK [3/5|2/3|3/4|5/6|8/9|9/10], 8PSK [23/36|25/36|13/18], 16APSK-L [5/9|8/15|1/2|3/5|2/3], 16APSK [2/3|3/4|5/6|8/9|9/10], 16APSK [26/45|3/5|28/45|23/36|13/18|7/9|77/90], 32APSK-L [2/3], 32APSK [3/4|4/5|5/6|8/9|9/10], 32APSK [32/45|11/15|7/9], 64APSK-L [32/45], 64APSK [11/15|7/9|4/5|5/6], 128APSK [3/4|7/9], 256APSK-L [29/45|2/3|31/45|11/15], 256APSK [32/45|3/4], ACM (Adaptive Coding and Modulation), Annex M, Channel Bonding (S2X), Error correction: LDPC 720 MBit/s, Long Frames, MIS (Multiple Input Streams), Maximum Baudrate 500MBits, Maximum DVB-S2/S2X LDPC-Bitrate for all 8 Tuners is 720 MBit/s, QPSK [1/2|3/5|2/3|3/4|4/5|8/9|8/10], QPSK [1/4|1/3|2/5], QPSK [13/45|9/20|11/20], Short Frames, VCM (Variable Coding and Modulation), VL-SNR
Maximum Symbol Rates: 8APSK [86], 8PSK [86], 16APSK [64.5], 32APSK [51.6], 64APSK [43], 128APSK [36.85], 256APSK [32.25], Annex M 500, QPSK [~95]
DVB Standards: DVB-S, DVB-S2, DVB-S2X
Demodulators/Channels/Tuners (Frontends): 8
Power Consumption: approx. 7 watts without LNB power
Features: DiSEqC 2.x via SCR, Digital TV, HD (H.264/MPEG-4), SD (H.262/MPEG-2), UHD (H.265/HEVC), Unicable I (SCR) EN50494, Unicable II | JESS (SCR) EN50607
Autodeploy Script: DKMS Driver DDDVB-0.9.39 for Proxmox 8
1. Autodeploy Script DKMS Driver DDDVB-0.9.39 for Proxmox 8
#!/bin/bash

# Install essential build tools and kernel headers
apt -y install git make cmake gcc dvb-tools htop dkms build-essential patchutils libproc-processtable-perl pve-headers-$(uname -r)

# Download and extract the driver source code
echo "Downloading and extracting the driver source code..."
cd /usr/src/
wget https://github.com/DigitalDevices/dddvb/archive/0.9.39.tar.gz -O dddvb-0.9.39.tar.gz
tar -xf dddvb-0.9.39.tar.gz
cd dddvb-0.9.39

# Create the dkms.conf configuration file
echo "Creating dkms.conf file..."
cat < /dev/null
PACKAGE_NAME=dddvb
PACKAGE_VERSION=0.9.39
# Comment or remove the next line to avoid deprecated warnings
# REMAKE_INITRD=no

MAKE="make -j 4 KERNELDIR=/lib/modules/${kernelver}/build"
CLEAN="make clean"
AUTOINSTALL=yes

BUILT_MODULE_NAME[0]=tda18271c2dd
BUILT_MODULE_LOCATION[0]=frontends
DEST_MODULE_LOCATION[0]=/updates/dkms

BUILT_MODULE_NAME[1]=stv090x
BUILT_MODULE_LOCATION[1]=frontends
DEST_MODULE_LOCATION[1]=/updates/dkms

BUILT_MODULE_NAME[2]=lnbh25
BUILT_MODULE_LOCATION[2]=frontends
DEST_MODULE_LOCATION[2]=/updates/dkms

BUILT_MODULE_NAME[3]=drxk
BUILT_MODULE_LOCATION[3]=frontends
DEST_MODULE_LOCATION[3]=/updates/dkms

BUILT_MODULE_NAME[4]=cxd2843
BUILT_MODULE_LOCATION[4]=frontends
DEST_MODULE_LOCATION[4]=/updates/dkms

BUILT_MODULE_NAME[5]=stv0367dd
BUILT_MODULE_LOCATION[5]=frontends
DEST_MODULE_LOCATION[5]=/updates/dkms

BUILT_MODULE_NAME[6]=stv6111
BUILT_MODULE_LOCATION[6]=frontends
DEST_MODULE_LOCATION[6]=/updates/dkms

BUILT_MODULE_NAME[7]=tda18212dd
BUILT_MODULE_LOCATION[7]=frontends
DEST_MODULE_LOCATION[7]=/updates/dkms

BUILT_MODULE_NAME[8]=cxd2099
BUILT_MODULE_LOCATION[8]=frontends
DEST_MODULE_LOCATION[8]=/updates/dkms

BUILT_MODULE_NAME[9]=lnbp21
BUILT_MODULE_LOCATION[9]=frontends
DEST_MODULE_LOCATION[9]=/updates/dkms

BUILT_MODULE_NAME[10]=stv6110x
BUILT_MODULE_LOCATION[10]=frontends
DEST_MODULE_LOCATION[10]=/updates/dkms

BUILT_MODULE_NAME[11]=stv0910
BUILT_MODULE_LOCATION[11]=frontends
DEST_MODULE_LOCATION[11]=/updates/dkms

BUILT_MODULE_NAME[12]=mxl5xx
BUILT_MODULE_LOCATION[12]=frontends
DEST_MODULE_LOCATION[12]=/updates/dkms

BUILT_MODULE_NAME[13]=ddbridge
BUILT_MODULE_LOCATION[13]=ddbridge
DEST_MODULE_LOCATION[13]=/updates/dkms

BUILT_MODULE_NAME[14]=octonet
BUILT_MODULE_LOCATION[14]=ddbridge
DEST_MODULE_LOCATION[14]=/updates/dkms

BUILT_MODULE_NAME[15]=dvb-core
BUILT_MODULE_LOCATION[15]=dvb-core
DEST_MODULE_LOCATION[15]=/updates/dkms
EOF

# Clean up any previous builds
echo "Cleaning up any previous builds..."
sudo dkms remove dddvb/0.9.39 --all || true

# Add the module to the DKMS tree
echo "Adding the module to DKMS..."
sudo dkms add dddvb/0.9.39

# Build the module
echo "Building the module..."
sudo dkms build dddvb/0.9.39 --force

# Install the module
echo "Installing the module..."
sudo dkms install dddvb/0.9.39 --force

# Verify the installation
echo "Verifying the installation..."
dkms status | grep dddvb

echo "Installation complete."
Autodeploy Script: DKMS Driver DDDVB-0.9.39 for Ubuntu 22.04
2. Autodeploy Script DKMS Driver DDDVB-0.9.39 for Ubuntu 22.04
#!/bin/bash

# Script to auto-deploy ddbridge kernel module with DKMS on Ubuntu

# Exit immediately if a command exits with a non-zero status
set -e

# Update package list and install required packages
echo "Updating package list and installing DKMS..."
sudo apt-get update
sudo apt-get install -y dvb-tools htop dkms build-essential linux-headers-$(uname -r) git wget

# Download and extract the driver source code
echo "Downloading and extracting the driver source code..."
cd /usr/src/
wget https://github.com/DigitalDevices/dddvb/archive/0.9.39.tar.gz -O dddvb-0.9.39.tar.gz
tar -xf dddvb-0.9.39.tar.gz
cd dddvb-0.9.39

# Create the dkms.conf configuration file
echo "Creating dkms.conf file..."
cat < /dev/null
PACKAGE_NAME=dddvb
PACKAGE_VERSION=0.9.39
# Comment or remove the next line to avoid deprecated warnings
# REMAKE_INITRD=no

MAKE="make -j 4 KERNELDIR=/lib/modules/${kernelver}/build"
CLEAN="make clean"
AUTOINSTALL=yes

BUILT_MODULE_NAME[0]=tda18271c2dd
BUILT_MODULE_LOCATION[0]=frontends
DEST_MODULE_LOCATION[0]=/updates/dkms

BUILT_MODULE_NAME[1]=stv090x
BUILT_MODULE_LOCATION[1]=frontends
DEST_MODULE_LOCATION[1]=/updates/dkms

BUILT_MODULE_NAME[2]=lnbh25
BUILT_MODULE_LOCATION[2]=frontends
DEST_MODULE_LOCATION[2]=/updates/dkms

BUILT_MODULE_NAME[3]=drxk
BUILT_MODULE_LOCATION[3]=frontends
DEST_MODULE_LOCATION[3]=/updates/dkms

BUILT_MODULE_NAME[4]=cxd2843
BUILT_MODULE_LOCATION[4]=frontends
DEST_MODULE_LOCATION[4]=/updates/dkms

BUILT_MODULE_NAME[5]=stv0367dd
BUILT_MODULE_LOCATION[5]=frontends
DEST_MODULE_LOCATION[5]=/updates/dkms

BUILT_MODULE_NAME[6]=stv6111
BUILT_MODULE_LOCATION[6]=frontends
DEST_MODULE_LOCATION[6]=/updates/dkms

BUILT_MODULE_NAME[7]=tda18212dd
BUILT_MODULE_LOCATION[7]=frontends
DEST_MODULE_LOCATION[7]=/updates/dkms

BUILT_MODULE_NAME[8]=cxd2099
BUILT_MODULE_LOCATION[8]=frontends
DEST_MODULE_LOCATION[8]=/updates/dkms

BUILT_MODULE_NAME[9]=lnbp21
BUILT_MODULE_LOCATION[9]=frontends
DEST_MODULE_LOCATION[9]=/updates/dkms

BUILT_MODULE_NAME[10]=stv6110x
BUILT_MODULE_LOCATION[10]=frontends
DEST_MODULE_LOCATION[10]=/updates/dkms

BUILT_MODULE_NAME[11]=stv0910
BUILT_MODULE_LOCATION[11]=frontends
DEST_MODULE_LOCATION[11]=/updates/dkms

BUILT_MODULE_NAME[12]=mxl5xx
BUILT_MODULE_LOCATION[12]=frontends
DEST_MODULE_LOCATION[12]=/updates/dkms

BUILT_MODULE_NAME[13]=ddbridge
BUILT_MODULE_LOCATION[13]=ddbridge
DEST_MODULE_LOCATION[13]=/updates/dkms

BUILT_MODULE_NAME[14]=octonet
BUILT_MODULE_LOCATION[14]=ddbridge
DEST_MODULE_LOCATION[14]=/updates/dkms

BUILT_MODULE_NAME[15]=dvb-core
BUILT_MODULE_LOCATION[15]=dvb-core
DEST_MODULE_LOCATION[15]=/updates/dkms
EOF

# Clean up any previous builds
echo "Cleaning up any previous builds..."
sudo dkms remove dddvb/0.9.39 --all || true

# Add the module to the DKMS tree
echo "Adding the module to DKMS..."
sudo dkms add dddvb/0.9.39

# Build the module
echo "Building the module..."
sudo dkms build dddvb/0.9.39 --force

# Install the module
sudo dkms install dddvb/0.9.39 --force

# Verify the installation
echo "Verifying the installation..."
dkms status | grep dddvb

echo "Installation complete."
Advanced System Preparation
Note: For rapid deployment and streamlined execution of these scripts, it is recommended to install the ‘cURL’ utility. This will allow for efficient downloading and running of scripts directly from the command line.
To install cURL, execute the following command:
$ sudo apt install curlIf you prefer using wget, download the scripts, make them executable, and run them using the following commands:
$ chmod u+x script.sh
$ ./script.sh
Running Bash Scripts
To execute a Bash script in a Linux environment, provide the full path to the script and include any necessary arguments:
$ ./path/to/script <arg1> <arg2> ... <argn>Digital Devices Scripts: Essential Tools for DVB Management
1. ddinfo.sh
The ddinfo.sh script is an indispensable tool for gathering comprehensive information about Digital Devices cards, including card identification, PCI address, firmware/drivers versions, and operational temperature. This script is vital for monitoring and troubleshooting in high-demand environments.
Verbose Mode: Enable verbose mode by using the -v option for detailed output.
Script Location: http://linuxsupport.digital-devices.eu/ddinfo.sh
Example Usage:
$ curl -s http://linuxsupport.digital-devices.eu/ddinfo.sh | bash2. dddvb_build.sh
The dddvb_build.sh script automates the compilation of DDDVB drivers, offering a range of configuration options to suit various deployment scenarios. This script requires root privileges.
Options:
-g|--git: Download and build the latest Git version of the drivers.-f|--fmode: Configure the operating mode for Max S8/SX8/SX8 Basic cards.-v|--version: Specify the driver version (e.g., 37 for 0.9.37, 38 for 0.9.38, 39 for 0.9.39).-m|--max-adapters: Set the maximum number of adapters (default is 64).-M|--msi: Enable or disable MSI for ddbridge.
Script Location: http://linuxsupport.digital-devices.eu/dddvb_build.sh
Example Usage:
# curl -s http://linuxsupport.digital-devices.eu/dddvb_build.sh | bash
# curl -s http://linuxsupport.digital-devices.eu/dddvb_build.sh | bash /dev/stdin -g
# curl -s http://linuxsupport.digital-devices.eu/dddvb_build.sh | bash /dev/stdin -g -f 2
# curl -s http://linuxsupport.digital-devices.eu/dddvb_build.sh | bash /dev/stdin -v 39 -f 1
3. dd_fw_update.sh
The dd_fw_update.sh script facilitates the updating of firmware across all DVB cards within the system. This script is crucial for maintaining the latest features and fixes in high-density streaming environments. As this script affects all cards in the system, it is recommended to follow specific instructions if firmware updates are needed for individual cards.
Script Location: http://linuxsupport.digital-devices.eu/dd_fw_update.sh
To update firmware:
# curl -s http://linuxsupport.digital-devices.eu/dd_fw_update.sh | bashDDbridge Mode Selection
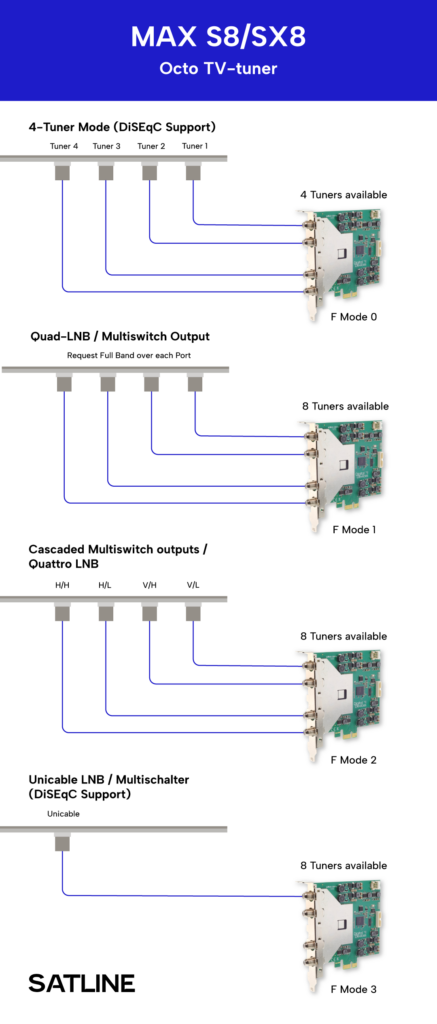
The Digital Devices Max SX8 Pro (4/8) offers multiple operation modes to suit various installation scenarios. These modes allow for flexibility in connecting to different types of LNBs and multiswitches. Below is a detailed description of each mode, accompanied by an image map that provides a visual guide to the connection types:
Operation Mode 0: 4 Tuner Direct
The “4 Tuner” mode allows the four inputs of the card to function as individual tuners. This mode supports multiple satellites (DiSEqC) and requires 1 to 4 cables from a multiswitch or LNB with an integrated multiswitch.
Operation Mode 1: Quad LNB or 4 Multiswitch Outputs
Use this option to connect your Max SX8 to a standard multiswitch or a LNB with an integrated multiswitch (QUAD LNB or OCTO LNB). This configuration requires four SAT lines to enable full-featured and full reception across all four SAT levels.
Operation Mode 2: Quattro LNB or Multiswitch Cascade Output (VL, VH, HL, HH)
This mode is ideal when connecting the Max SX8 to a cascade-capable multiswitch. Such multiswitches have additional outputs known as “cascade outputs” that pass through the signals received from a Quattro LNB. Alternatively, the four outputs can be directly connected to a Quattro LNB without a multiswitch.
Operation Mode 3: Single Cable Solution
In this mode, the card can be used with a single antenna cable via Unicable® or JESS® supported equipment. This allows up to 8 tuners to operate with a UniCable® system and up to 32 tuners with a JESS® system, with only one cable required for all tuners.
The Digital Devices MAX SX8 can be integrated into numerous TV applications and is compatible with both Windows and Linux environments, making it a versatile choice for any dedicated media streaming setup.